


0
Space Scene from Scratch with Photoshop
In this intermediate-to-advanced-level design tutorial on photoshop, we are going to create a stunning space scene that has realistic-looking planets, stars, and lighting effects using a few innovative Photoshop techniques and some textures. great photoshop tutorial.
Visit the tutorial
Read more
Visit the tutorial
0

Create an awesome abstract wallpaper by making your own abstract art in Adobe Photoshop.
Read more
Abstract desktop wallpaper in photoshop!

Create an awesome abstract wallpaper by making your own abstract art in Adobe Photoshop.
0

Learn how to create a realistic Ice effect in photoshop with this great tutorial! Amazing graphic design tutorial made easy in this photoshop walk through guide!
Read more
Create a realistic Ice effect in Photoshop!

Learn how to create a realistic Ice effect in photoshop with this great tutorial! Amazing graphic design tutorial made easy in this photoshop walk through guide!
0
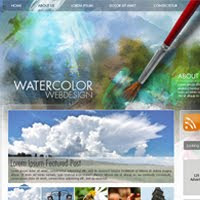 Watercolor in graphic design has become very trendy the last couple of years, many websites and incredible designers are using this style and taking it to another level, these designs can be made easily with photoshop. Even knowing the technique is important in this kind of design, is more about creativity and experimentation. You will learn how to use the Art History Brush and combine it with watercolor custom brushes to create a nice background header image and more all on photoshop. Let's get it started!
Read more
Watercolor-Themed Website Design with Photoshop
 Watercolor in graphic design has become very trendy the last couple of years, many websites and incredible designers are using this style and taking it to another level, these designs can be made easily with photoshop. Even knowing the technique is important in this kind of design, is more about creativity and experimentation. You will learn how to use the Art History Brush and combine it with watercolor custom brushes to create a nice background header image and more all on photoshop. Let's get it started!
0
 In this tutorial using photoshop, we'll learn how to get that smooth shiny Anime look. We'll start with a simple character outline uploaded into photoshop and build the correct hierarchy for the base colors, tones and highlights. Also, we'll learn how to work with this "method" for later projects in case the client or director will ask for changes, it will be easy to replace colors for a specific part of the character without redrawing all the tones and highlights again! You are about to learn one of the many techniques from the Anime and photoshop industry. Let's get started!
Read more
Get an Anime Look in Photoshop
 In this tutorial using photoshop, we'll learn how to get that smooth shiny Anime look. We'll start with a simple character outline uploaded into photoshop and build the correct hierarchy for the base colors, tones and highlights. Also, we'll learn how to work with this "method" for later projects in case the client or director will ask for changes, it will be easy to replace colors for a specific part of the character without redrawing all the tones and highlights again! You are about to learn one of the many techniques from the Anime and photoshop industry. Let's get started!
0
40 Photoshop tutorials for Rain showers and water drops!
Read more

5
Water Reflection in Photoshop!
A great tutorial for Graphic Designers! The technique is used all over the design world and has been made famous by photoshop, it has been made easy to apply this effect because of photoshop!
Read more
Step 1
Open a new Photoshop document with a black background. Import in your document a picture like the below:

Step 2
Duplicate the layout with the picture and choose Edit > Transform > Flip Vertical. Move the duplicate picture:

Step 3
Now Filter > Liquify and distort the duplicate picture. Choose the Brush Tool in the Tab Tools “Airbrush Soft Round 200” and delete a area to adjust the bottom of the duplicate picture. And the result:

Step 4
Create a new layer before the layer with the duplicate picture and draw a rectangle with the background color “#633100”. In the Tab Tools “Set the blending mode for layers” to “Color” and the result should be this:

0
Eco looking green website on photoshop!
This tutorial using Adobe Photoshop will help enhance your Graphic design skills and will give you a great insight into photoshop.
Read more
Step 1
Open a new document in Adobe Photoshop of about 650x500 pixel. Fill it up with white. With your Rounded Rectangular Tool draw a rectangular. Go to Layer > Layer Style > Gradient Overlay. Here set it just like below and make sure you check the “reverse” box.

Now to make those little flowers and grass. You take your Lasso Tool and start drawing flowers and leaves shapes. This is with what I came up with. They don`t have to be perfect and just need to look like some.

This is the picture I choose for the header, you can use anything you like.

For the menu, make a new document, draw in it a small rounded rectangular and fill it with the same green you ended the header of. Now cut it in two and drag and drop the parts on the website. I only have 3 buttons, but you can have as many as you like.

The header is done. So Ctrl+Right click on every layer, without the first layer and Merge Layers.
Step 2
For the text above use the following color (#708348). The title should be bigger and with “bold” or “strong” and the subtitle should be smaller and not ”strong”.

Step 3
Now the structure is ready. Depends on what theme will you pick for the website. Mine is a non-profit organization that is helping children. In the Box below you should add info and because of the colors you can divide it in sections.
Step 4
Now add the text and anything else you like and the layout is ready. Mine looks like this.

0

A great variety of the years best logo trends from the classic typographic to the modern pictograms, really is a treat for the eyes, Quality Graphic Designs!
Read more
An Exciting Showcase of 2009 Logo Trends

A great variety of the years best logo trends from the classic typographic to the modern pictograms, really is a treat for the eyes, Quality Graphic Designs!
0
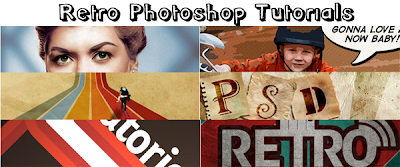
Retro Photoshop tutorials for the graphic designer thats looking to do some old skool designing! great graphic design tutorials for photoshop!
Read more
60+ Vintage, Retro, and Pop Art Styled Photoshop Tutorials

Retro Photoshop tutorials for the graphic designer thats looking to do some old skool designing! great graphic design tutorials for photoshop!

0
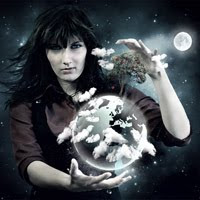
In this tutorial Jarka H will show you how to use different blending modes to blend flying hairs easily and to make semi-transparent planet. he'll also show you different techniques of adjustment to get the most realistic results in your photo manipulations! great graphic design!
Read more
Blend a Planet into a Photo Manipulation

In this tutorial Jarka H will show you how to use different blending modes to blend flying hairs easily and to make semi-transparent planet. he'll also show you different techniques of adjustment to get the most realistic results in your photo manipulations! great graphic design!
0
Read more
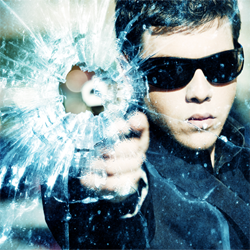
Gunshot through a glass effect!

Great graphic design tutorial on how to create a gunshot effect using adobe photoshop. The outcome of the tutorial reveals a very life like image of a gunshot through a glass effect. Well worth visiting, great use of graphic design techniques

0

Creating an Environmentally Friendly Green Type Treatment
“With oil prices the way they are today, everybody is thinking Green… In the following Illustrator tutorial, I’ll teach you how to create a Green type treatment. It works great for logos and other design elements.”
Excellent tutorial, great use of highlights and shadows to create depth.
Visit the tutorial
Read more
Environmentally friendly design :D

Creating an Environmentally Friendly Green Type Treatment
“With oil prices the way they are today, everybody is thinking Green… In the following Illustrator tutorial, I’ll teach you how to create a Green type treatment. It works great for logos and other design elements.”
Excellent tutorial, great use of highlights and shadows to create depth.
Visit the tutorial
0
Christmas Tree Design
It’s almost Christmas time and time to send greeting cards to all your friends and relatives. In this tutorial you will learn to make a Christmas tree that you can use on your own Christmas card.
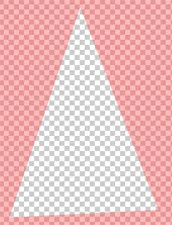
Step 1
Open a new Adobe Photoshop document 400x400 pixels with transparent background. Make a new layer and with your Polygonal Lasso Tool draw the shape of a Christmas tree. Now click on Edit in Quick Mask Mode (Q).The shape will keep its form and color but the background will turn pink.
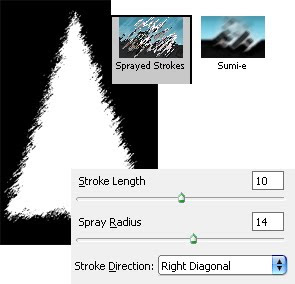
Step 2
Now go to Filter->Brush Strokes->Sprayed Strokes. Here set everything like in the image and your tree will start looking like a Christmas tree.
Exit Quick Mask Mode (Q) and deselect the shape. Fill the shape with #36541e. Now make sure the layer with the tree is selected and go to Filter->Stylize->Extrude.
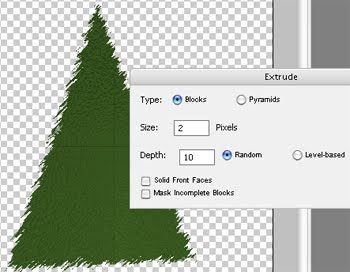
You can see you have two small black lines. You can fix that with Clone Stamp Tool (S). This way the tree will look more real.
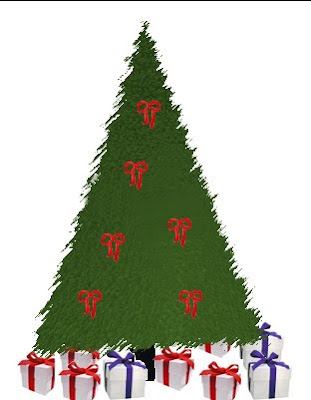
Step 3
In this step we will decorate the tree. I will use only red ribbon, because it gives a warm look. The red ribbon I used is this:

After the ribbon is time to add some presents under the tree. I used these two pictures.


Before adding the present go to Layer 1 and fill it with white. This way the present will look better.
Here is what I come up with.
Read more
Step 1
Open a new Adobe Photoshop document 400x400 pixels with transparent background. Make a new layer and with your Polygonal Lasso Tool draw the shape of a Christmas tree. Now click on Edit in Quick Mask Mode (Q).The shape will keep its form and color but the background will turn pink.

Step 2
Now go to Filter->Brush Strokes->Sprayed Strokes. Here set everything like in the image and your tree will start looking like a Christmas tree.

Exit Quick Mask Mode (Q) and deselect the shape. Fill the shape with #36541e. Now make sure the layer with the tree is selected and go to Filter->Stylize->Extrude.

You can see you have two small black lines. You can fix that with Clone Stamp Tool (S). This way the tree will look more real.
Step 3
In this step we will decorate the tree. I will use only red ribbon, because it gives a warm look. The red ribbon I used is this:

After the ribbon is time to add some presents under the tree. I used these two pictures.


Before adding the present go to Layer 1 and fill it with white. This way the present will look better.
Here is what I come up with.

0
iTunes Remote Control
Step 1
Open new document 500x300 pixels. Choose as background color a dark color or anything else but not white or light colors. Make a new layer and with your Rounded Rectangular Tool draw a rectangular and fill it up with white.

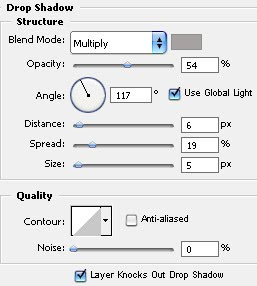
Add some shadow by going to Layer->Layer Style->Drop Shadow and setting everything like in the image.
Step 2
Make a new layer. Set the foreground color to #e8e6cf. In the upper right corner, not to close to the edge, draw a rectangular. Because the foreground is that light yellow, the rectangular will have the same color.

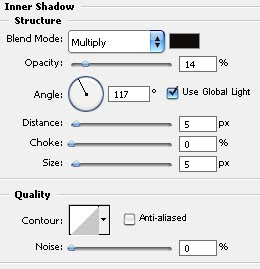
Go to Layer->Layer Style->Inner Shadow to add some shadow to the new rectangular. Set everything like in the image.
To add some glassy effect, open another layer. With the Rectangular Marquee Tool draw a rectangular over the upper half of the yellow rectangular. Fill it with white and set the opacity to 29%. Now add some text.

Step 3
Open a new layer. With your Elliptical Marquee Tool draw a circle in the left side of the remote (that is empty). Fill it up with Gradient. Use #f5f5f5 and #ebecee.
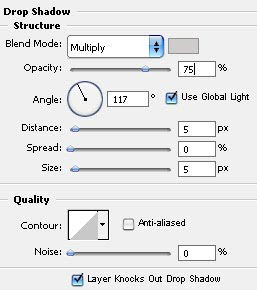
To look like a button, add some shadow. Layer->Layer Style->Drop Shadow.
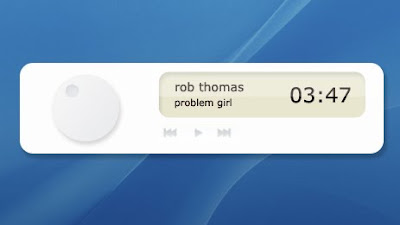
The remote is done. The final result should look like this.
Read more
Open new document 500x300 pixels. Choose as background color a dark color or anything else but not white or light colors. Make a new layer and with your Rounded Rectangular Tool draw a rectangular and fill it up with white.

Add some shadow by going to Layer->Layer Style->Drop Shadow and setting everything like in the image.

Step 2
Make a new layer. Set the foreground color to #e8e6cf. In the upper right corner, not to close to the edge, draw a rectangular. Because the foreground is that light yellow, the rectangular will have the same color.

Go to Layer->Layer Style->Inner Shadow to add some shadow to the new rectangular. Set everything like in the image.

To add some glassy effect, open another layer. With the Rectangular Marquee Tool draw a rectangular over the upper half of the yellow rectangular. Fill it with white and set the opacity to 29%. Now add some text.

Step 3
Open a new layer. With your Elliptical Marquee Tool draw a circle in the left side of the remote (that is empty). Fill it up with Gradient. Use #f5f5f5 and #ebecee.
To look like a button, add some shadow. Layer->Layer Style->Drop Shadow.

The remote is done. The final result should look like this.

Subscribe to:
Posts (Atom)